
How to Add Anchor Links Easily in WordPress and Why?
We are taking benefit of anchor links in our lengthy WordPress posts so to help the users to jump to the topic they are searching for quickly.
Just have a glance at our Domain Registrars post there you will see examples of anchor links under “Quick Navigation” heading. Anchor links are usually placed in the table of contents, so the user who is searching for specific content can quickly access that.
Furthermore, it is also good from the SEO side as Google may show the listing below your site in search engine results.
There is no rocket science in it, so if you are a beginner, feel free, it’s a super easy process.
Mainly there are 2-ways to use the anchor links: Manual and Automatic. We are going to discuss both here.
So let’s go ahead and start with a live example of anchor links. Below is the list of topics we are going to cover.
Click on a topic you want to learn around, and it will take you to the location.
- What is Anchor Link/tag?
- Benefit of Anchor tag?
- How to manually add anchor link using WordPress editor?
- Quick Summary for placing anchor link manually.
- How to automatically add anchor link in WordPress post/page?
What is Anchor Link/tag?
An anchor link is a type of link within a post to leapfrog to a specific location on that same post/page. It leads the users to specific content on the post in which they are interested the most. So it proves really a helping hand for the users who land on your website.
An average user takes around two to three seconds whether to stay on the website or not. So that’s the time you got to make them stay on your site.
The best way to convince them is to provide the content they interested in. And this is where anchor links play an imperative role. By clicking on the link, the users can skip the other content and jump to the part they want to read.
Benefit of Anchor tag?
Help in Organizing the Content: With the help of anchors, you can keep things in order. For example, you have a longer post. Using an anchor tag, you can organize it and enhance the user experience. Further, instead of splitting the content into different posts, anchors allow the webmaster to keep all at one place without tangling the content.
Save Time and No Scrolling: Almost the biggest benefit for your audience that they won’t have to scroll to the end to read the content that you placed at the end of the post. And sometimes, when you are scrolling fast, you even pass through the content you are searching for, which is confusing. So to jump to the right content anchor tags are really useful for users.
For SEO/ Search Engine Use: Another tempting benefit is that search engines like Google use anchor links in search results so the users can directly land to that specific content that you are linking to. So it’s a plus point for getting more traffic and improving search engine ranking

That’s enough talk now let’s move to the process that how you can add it.
How to Add Anchor Link Manually in WordPress:
The manual process is usually preferable when you want to add fewer specific links in your article. It consists of two steps.
- The anchor link using # sign. It is where the user click to jump to the content they want to read
- The place where you want the user to land, or we can say the main content you are linking to.
Let’s begin
Step 1:
Open the WordPress post in which you want to use anchor links. Now select the text you want to link and then insert link button available in WordPress editor

After clicking the Insert button, it will pop up a small window where you usually place links. This time for anchor link use # and then type the keywords related to the section you want the user to land on.

And then hit the Apply button. Here are some quick tips while typing the # link.
- Don’t use lengthy and complicated sentences.
- Use keywords to which you are linking.
- Hyphens are not essential, but it just makes the text more readable, so make use of that.
So far, you successfully created the anchor link, but clicking on it won’t do anything. That’s because you did not place the ID for the link so the browser won’t lead you anywhere.
Step 2:
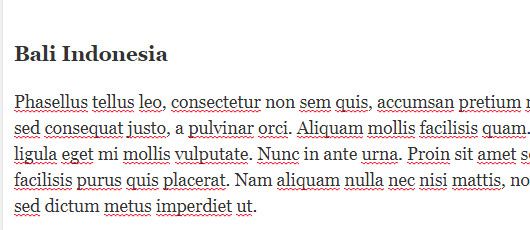
Step 2 is also very easy as the first step and involves a simple code line. In the WordPress editor, while remaining in your post, scroll down to the content where you want the user to navigate when clicked on the anchor link created in the first step.
For example, we want the user to navigate to the paragraph shown in the below image.
Now click on the “Text” button given in the WordPress editor top right corner.

Navigate to the paragraph and then type this code line
<a name=”title of the section”></a>
In place of the title of the section, place the same title that you use in the first step but without # prefix. See the below image.

In order to see whether you have placed the anchor or not, you can switch back to “Visual” mode in WordPress editor. You can see a small sign like this
![]()
Congratulations! You have manually placed the anchor link/tag successfully. Now save your post and “Preview” it to check whether it’s working or not.
Quick Summary
- Select the text you want to use as an anchor link. Use insert link and instead of providing other page URL type a keyword with #. For example #fastest-cars
- Now scroll to the content section where you want your users to jump when they click on anchor link.
- Switch to “Text” mode of WordPress editor. Then place this code
<a name=”your keyword (that you use in the first step)”></a>
As per our example it will be <a name=”fastest-cars”></a>
How to Automatically Add Anchor Links Using Plugin?
Method 1
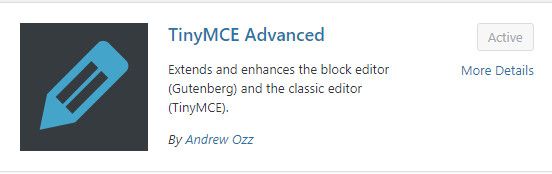
Using wordpress plugin is the easiest way to add anchor links in longer posts. So head over to WordPress plugins and install TinyMCE Advanced. It is one of the best plugins for adding anchor with 2M+ installs. After installing and activating the plugin, you will see it adds some additional functionalities in WordPress editor
Step 1:
Once you have installed and activated now go into your post and do the following
- Select the text you want to use as anchor link
- Use insert link button
- Now instead of linking to other Page/Post simply type the keyword with # related to the text you are linking to.
(So far, it’s the same process as we did in Step 1 when describing adding manual anchor links.)
Step 2:
In Step 2 do the following
- Move to the paragraph where you want the users to navigate when they click on the anchor link that you created in Step 1.
- Select the text you want to link up to.
- Then from plugin shown features click “Insert” and then “Anchor”

- Type the name you gave it in Step 1 like we do Bali-Indonesia, but don’t use # when inputting id.
Congratulations! You have done it successfully. This plugin saves a lot of your precious time because you don’t have to leave the “Visual” to “Text” editor. Also, you don’t have to enter any code line manually.
Method 2:
Another method to make use of anchor links to enhance user experience is using another plugin. It makes the process even faster than the above mentioned plugin. Easy Table of Contents is one of the best plugins that are very helpful for webmasters who use to publish long articles. It has over 100K installs with a pretty good rating.
Head over to WordPress plugins section search Easy Table Contents and Install and activate it.
This plugin performs most of the work pretty automatically. It will create a table of content with anchor links by guessing headings as the content section where you want to lead your audience. However, from plugin settings, you can customize it according to your needs.
So let’s begin
Step 1
- Install and activate the plugin
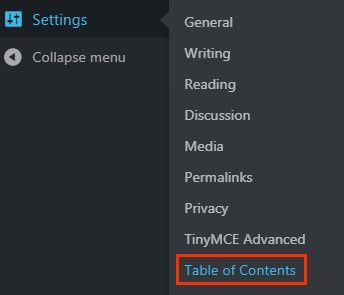
- Now navigate to plugin settings as shown below
- By default, the plugin is enabled for pages so in “Enable Support” section enable it for posts.

- The “Auto Insert” option enables you to add anchor links for all posts automatically. But if you want to show it up on selected posts then uncheck this option.

- Scroll down a little bit where you can configure the settings like where to display the table and when to show it etc.

- Further settings include its appearance.
- In “Advanced” settings, you can choose what heading to include or exclude from the table.
- After doing the desired setting don’t forget to hit “Save Changes” button.
Step 2
So how do you put a table of content in posts?
- If you enable Auto Insert, the plugin will automatically add the table of contents for all posts.
- To insert anchor links table of content manually head over to that specific post.
- Once you are in WordPress post editor, scroll down to the end, and you will see “Table of Contents” where you can check the “Insert table of contents” option.
- Save changes and go check in preview.
The plugin automatically show the table of content upon your settings.
Conclusion:
Even if you are a beginner, you can make use of anchor links almost effortlessly. Above, we mentioned various ways of how you can insert anchor links manually and automatically. If you usually publish long articles, using anchor links is the best way to help your audience to provide access to the content quickly. Furthermore, it also offers you a plus point from the search engine point of view.